Dragon Egg
X3 Black Cannon Tiger
X4 Cannon Fire Dragon, Sledge Ankylo
X4 Dragon Bird, Firepteryx
X1 Herbivorous Dragon, Brutosaurus
X4 Ironclad Dragon, Steelsaurus
X4 Archird
X4 Sonic Noa
X4 Winged Dragon, Beamptero
X3 Winged Dragon, Skyptero
X3 Cannon Fire Dragon, Cannon Gear
X3 Ravenous Dragon, Megarex
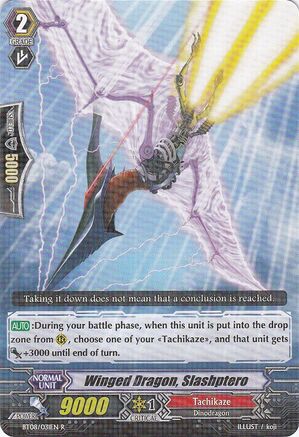
X4 Winged Dragon, Slashptero
X4 Destruction Dragon, Dark Rex
X4 Tyrant, Deathrex
X4 Destruction Dragon, Dark Rex
X4 Tyrant, Deathrex

Our starter here is key to what makes everything work together. Its measly 4K power is immediately mitigated by Deathrex's boosted attack, already creating 3 stages to essentially ensure a direct strike through Deathrex. It also provides a constant source of retire material during the early to midgame, where your coordinated strikes won't appear or be as influential on the fight yet, allowing you to maintain card advantage when you do need them. In any other case, it also serves to quickly pump up a Rear-Guard column while your forces are assembling. Any excess Grade 1 that exceeds at least 7K power would near instantly take 1 stage, which while very little at that point, still helps by enabling yet another part of your field to play a much more active role in the fight, without accidentally blowing your overall card advantage in the future, given the Counter-Blasts to spare. Even long after your field has finally taken its rounds and has fully developed, Dragon Egg serves one final job by turning into a 10K shield you can guard with giving you yet again just another edge over your opponent.
Triggers here are of little concern. The amount of offensive advantage the deck generates on its own is more than enough to justify the lack of need for Critical Triggers, or it can serve as evidence to the need to force the acceleration of the game, and incite even more Criticals to complement the already aggressive approach the deck takes. For now, 7 crit 5 draw remains a solid choice for EN players.
 The Winged Dragons perfectly fit a support role to the main strategy of the deck. With its solid 7K base, Beamptero serves as one of the ways the deck is able to reach its higher ranges of power to really push at the opponent and force them into a bind. Fueled by Tyrant Deathrex during the midgame, and Death Rex during the endgame, Beamptero's +3K power enables easy access to even more stage 3 attacks which are key for forcing even more damage unto the opponent, or dragging out more and more valuable resources when they matter most, respectively. It's this element of offensive capability on top of more than having the opportunity to have already used it in battle that Beamptero really offers for the rest of the deck to work with. Of course, as a booster and on the short end of the stick in the 14-19 booster-beater ratio spread out among anything Grade 1 and higher, this is not the skill that one should be tempted to spam, or risk leaving holes in your field and otherwise screwing yourself out of the offensive advantage you could've built into.
The other Winged Dragon, Skyptero, plays a slightly lesser role, but one easily as important. While Dragon Egg can easily serve the deck on its own, the gigantic matter that is Early Guarding should easily drag our attention to how we use our guard early in the fight. This is a moment in the game where even having yet another 10K shield to spare really can make a difference whether you're only stopping off at, say, 3 damage, or getting pushed to 4th and immediately being threatened by the opponent's Vanguard thus from. Instead, Skyptero can take over for Dragon Egg, giving you a much earlier opportunity to utilize the enhanced shielding.
 With all the focus on the possibilities a +3K boost can give for the field, and the opponent's Vanguard expected to be 10-11K, the obvious conclusion is that there needs to be a lot of focus built on properly setting up and maintaining 17-18K columns in order to build 3 stages all around and overtake the opponent through the combinations of skills. With that, Cannon Fire Dragon, Cannon Gear serves as the deck's 11K beater and otherwise jack of all trades as a forward unit. At 11K base, its strength easily comes to threaten opposing Vanguards even while unboosted, meaning that those who don't want to waste efforts on Intercepts that may or may not even be there, Cannon Gear can easily take point and lead your next attack. Furthermore, it can take virtually any Grade 1 booster and make it completely viable to combo off with the +3K boost, being able to hit 20K with Skyptero and break well over 21K with Sonic Noa. Similarly, Megarex plays the same role as a high powered beater, also reaching these important stage 3 columns with Beamptero or Sonic Noa.
Finally, Slashptero cannot serve the same roles that Cannon Gear and Megarex can. However, like Beamptero, Slashptero is yet another unit that can give others a +3K boost, creating stronger columns and pushing for even more power behind every attack. Unlike its Grade 1 counter-part, its on the much larger side of the distribution of power in the deck, meaning it's much easier to justify its use as you're more than likely to replace it right away when you do.
 Destruction Dragon, Dark Rex is yet another unit that can distribute that +3K boost that enables the deck to function at its aggressive pace as it is. It will often be the last unit you will need to worry about conserving when it comes to distributing power, since it directly leads to enabling its Limit Break. This all eventually leads to its end game danger zones. The 5th damage danger zone is anywhere under 55K shield in the form of 6 cards, while the 4th damage danger zone rests at anywhere under 40K shield in the form of 4 cards. Of course, this moves up by 5K shield and another card when the Winged Dragon's are fully involved, creating a much larger threat to the opponent.
Finally, Tyrant Deathrex leads as the deck's main midgame Vanguard. Against any 10K Vanguard, Tyrant Deathrex's 15K attack means that you wouldn't need a booster for its attack, so you'd have one extra card to develop your Rear-Guard columns or defend with that didn't exist otherwise. With Dragon Egg being able to maintain the costs and it being strong enough while boosted to otherwise punish the opponent even further if they do want to deal with Dark Rex, Tyrant Deathrex offers so much more synergy to the deck in creating a viable fighting force.
How the Deck Works
From the Early Game to the Midgame, all of the player's focus should be on preparing for the future. It's best to have knowledge over most if not all major decktypes in order to recognize what the opponent's Vanguard's base power is, so as soon as the fight starts, the player can decide whether or not Dragon Egg would serve best behind the Vanguard for an immediate 3 stage setup, or to the Rear-Guard columns to add a bit more of a punch while your resources are still spread thin. The deck is also going to have a very interesting time dealing with Early Guarding, due to Cannon Gear and Deathrex essentially demanding that one takes a few hits in order to maintain card advantage.


Ultimately, while this setup would be the penultimate goal of what the final field should build up into, there are 3 separate goals to achieve:
1. Maintain a safety net for Deathrex.
2. Create a 17-18K column.
3. Get at least 1 +3K -ptero out onto the field.
In order of importance. During the early to midgame, maintaining that safety net is absolutely necessary for the deck to best stay in the fight without Deathrex eating its own Rear-Guards and losing out on Card Advantage. Luckily, neither Dragon Egg or Skyptero need much consideration as to where they need to go. While the bare essentials of getting the Vanguard to 3 stages if it isn't already, or building the Rear-Guard columns obviously take priority, the fact remains that with Tyrant Deathrex clearing them off the field and back into your hand during the midgame and simply being able to call over them during the late game without losing card advantage means that one can focus more and more about the immediate benefits of utilizing Dragon Egg or Skyptero, rather than incorporating them too into future set ups.
From there, abusing 3 stage attacks is the key to victory for this deck. Deathrex alone can automatically size up while facing 10K Vanguards, and with Dragon Egg can take down anything else, so what's important is to plan ahead with how your Rear-Guard columns turn out. More than anything, correctly dictating when and where Intercepts play their roles and when to lock down the field will be crucial to the set up of your field. While units like Sonic Noa and Cannon Gear would require little to no special attention, and you can otherwise consider their placement on the field to be permanent once a power column is established, this would be far more important to more intricate combo plays including the +3K Winged Dragons. In the end, any combination of at least 2 -Pteros need to be present on the field by the late game, and more importantly, they'd need to be 2 of the 3 units that Dark Rex will retire to Superior Ride itself. This would make it far easier to gain access to a stage 3 attack in some form, generally through Dark Rex, and make the endgame all the more threatening.
The only real downside to the deck is just how unforgiving it is to the player utilizing it. Almost every action one make can and eventually will lead to a repercussion in some form that the player needs to deal with. Early hits must be allowed to get through in order to fuel Dragon Egg's skill, leaving openings for surprise Criticals and early damage rushes that might have been mitigated in a different scenario. A single screw up, or a poor hand simply forcing Grade 3s onto the field and preemptively locking down columns can quickly take away any midgame force the deck can hope to aim for, and even may come back to punish Dark Rex. Even the very option of utilizing 3 stage midgame strikes comes with their own risks, and while the option to back off from pushing will be there thanks to the timing of Deathrex's skill, simply retiring a booster off can lead to detriments in the long term, as recklessness can lead to the loss of card advantage the safety net is there to negate in the first place. On the other end of the spectrum, simply relying too much on Dragon Egg and/or Skyptero can lead to a stale midgame, reverting the deck to nothing more than vanilla beatsticking, and expecting to set the opponent up into a killzone with Dark Rex without any outside forms of generating advantage past field efficiency. Everything one can do will reflect upon the outcome of the fight, and it can end up being a bare test of skill to be able to even begin to utilize the deck.
In the end however, if one is able to use the deck correctly, the ability to flat out abuse stage 3+ attacks makes this deck something to fear. The ability to force the midgame to blaze by with the damage rush, only to line up into powerful late game plays later on with Dark Rex can easily give the player a leading edge in the fight. After learning how to build your field properly right away, and battering the learning curve necessary for the deck, its offensive capabilities come to rival many decks, and it builds itself a solid niche to more experienced players who want to play with power.
No comments:
Post a Comment