This took way too long to write
Grade 0
Dimensional Robo, Daimagnum
X4 Demonic Eye Monster, Gorgon
X4 Dimensional Robo, Daibattles
X4 Dimensional Robo, Gorescue
X4 Justice Cobalt
Grade 1
X2 Commander Laurel
X4 Dimensional Robo, Dailander
X4 Dimensional Robo, Daishield
X4 Karenroid, Daisy
Grade 2
X4 Dimensional Robo, Daidragon
X4 Dimensional Robo, Daidriller
X3 Dimensional Robo, Daifighter
Grade 3
X4 Super Dimensional Robo, Daiyusha
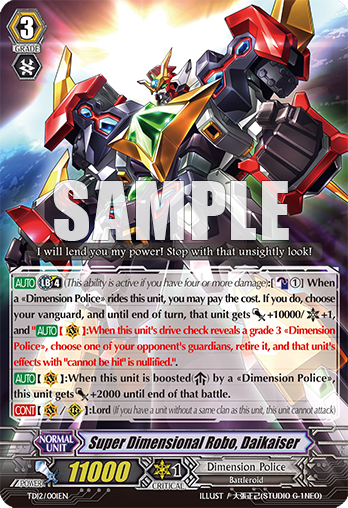
X2 Super Dimensional Robo, Daikaiser
X2 Ultimate Dimensional Robo, Great Daiyusha
Because the main gimmick of the deck operates by using SDR Daiyusha as a pressure unit, the deck uses a set of 12 Crits in order to push out the most from the opponent. By constantly and consistently regulating the opponent's hand by beating away at them with Daiyusha, it opens up opportunities for the rear guards to strike at the opponent due to them not usually being able to expend so many resources all across the board. Due to this lack of defense coupled by not having to deal with damage triggers by the opponent, the 12 Crits in this case are used to their fullest, taking advantage of the situation and granting you the most forward advantage per trigger.
Daimagnum's place in this deck is nearly invaluable. It provides a definite initiation into early game Daiyusha gambits, immediately setting up the deck for its winning image and dominating the opponent by turn 3. Due to how power ups and field stages work, its presence in the deck also allows for more flexible field arrangements as it can donate its power and presence to the Vanguard while also removing itself from the field, allowing you an option to help rearrange your setup, or better capitalize on your hand.
.jpg) After Daimagnum, Dailander and Daidriller take over to constantly pump up SDR Daiyusha. Assuming you already will ride SDR Daiyusha, and since turn 3 will usually be taken by Daimagnum, there will be a nearly 95.2% chance of getting at least one or the other of these boosters, and an 88.2% chance to get yet another turn 5, which alongside Daimagnum virtually guarantees a strong transition through the mid game as the deck consistently sets up against the opponent.
After Daimagnum, Dailander and Daidriller take over to constantly pump up SDR Daiyusha. Assuming you already will ride SDR Daiyusha, and since turn 3 will usually be taken by Daimagnum, there will be a nearly 95.2% chance of getting at least one or the other of these boosters, and an 88.2% chance to get yet another turn 5, which alongside Daimagnum virtually guarantees a strong transition through the mid game as the deck consistently sets up against the opponent.These cards also have some application for the late game. With a +4K boost, it would only take a 17K column to hit a stage 3 attack on 11K Vanguards, Daidragons and the 4 11K Grade 3s, along with Karenroid Daisy, is nigh impossible to not achieve, especially if 10K Vanguards come into the picture. Couple this with how cheap their abilities are through the midgame (assuming you use them up to turn 5, which will be where the late game begins), you would only have burned through 2 Counter Blasts. Once again noting how easy it is to create proper columns to utilize them, the duo aren't just one trick midgame ponies that die off as soon as you reach the late game, and transition well into the late game as options to power up your Rear Guards and completely dominate the opponent's hand throughout the late game as well.
With these units playing such an integral part of the deck's strategy however, one needs to be constantly aware of their immediate drawbacks by using them; their base power. Because of this, the deck's that much more reliant on your higher base power (and Daidragon) units, and demands that the player is able to think ahead so that the field scales properly on all fronts. With this in mind, not only are the myriad of beatsticks and Karenroid in the deck there to profit off late game rear guard gambits, but also provide a more than solid buffer to helping make sure the deck's own win condition doesn't accidentally make it fall behind and lose.
 The pint-sized elephant in the room here is Commander Laurel. With so much focus on making sure that columns stay strong, it's almost outright contradictory to include Commander Laurel in the deck. On the other hand though, the purpose it serves makes it close to invaluable to the deck, especially under the context of how the deck is normally supposed to function. More specifically, virtually all of the key cards explained up to this point, Daimagnum, Dailander, and Daidriller, all revolve around SDR Daiyusha and consistently maintaining pressure. In the off scenario that you aren't able to ride Daiyusha then, the deck quickly falls apart. Granted, one can argue that the late game strategy of beating away with Rear Guards can still work, and it could if you are really forced into it, but there's still the glaring problem that the deck's main means of functioning is still gone and the deck will fall behind because of that. With Commander Laurel, this problem is mostly avoided by granting either Daikaiser or Great Daiyusha similar pressure that makes SDR Daiyusha so potent and powerful for the deck.
 With all of the explanation behind the +4K units, it should be more than obvious what role Daiyusha plays in the deck. It is the go to ride on turn 3 and the best way for the deck to generate card advantage throughout the mid game, helping you get leverage over the opponent so that by the late game, it's becomes increasingly more difficult to possibly make a comeback as they fall farther and farther behind.
Daikaiser on the other hand isn't as integral to the main strategy, yet like Laurel, provides an amazing backup strategy to help bounce back should you lose SDR Daiyusha. Especially when allowed to combo off Great Daiyusha, a lot of ground can be immediately regained. For example, if you are at either 4 or 5 damage and the opponent is only at 3, Break Riding Great Daiyusha over Daikaiser is nearly guaranteed to trigger Great Daiyusha's Limit Break. Thanks to this, the opponent will most likely be forced to guard the Vanguard's attack unless they're willing to risk a Critical Trigger and losing. Also considering that the attack will be +25K, the opponent's hand advantage is absolutely going to crash trying to deal with the attack. Along with this raw power, Daikaiser's ability to retire Guardians only means that the opponent needs to expend that much more just to keep your attack in check. Between threatening to finish off the opponent from far behind to absolutely destroying the opponent's hand, the combo, with Laurel, gives the deck so much more to work with even without Daiyusha, rounding out its performance as a whole.
Finally, Great Daiyusha acts as the key transitional card into the late game. Defensively, 13K defense deters the opponent from too easily setting up columns that build for 10K magic numbers, and in the case they do so anyway, it forces them to have to reset their field, taking up quite a bit of effort and card advantage in the process. On the other end of the spectrum, if it was Cross or Break Ridden over Daiyusha or Daikaiser, it's otherwise guaranteed to meet its Soul Requirement for the late game. In other words, by the time the player enters the late game themselves, there should be zero debate over whether to use the +4K units on the Vanguard or on Rear Guard as Great Daiyusha does that job all on its own. Proper timing allows it to immediately takeover SDR Daiyusha's role and function unilaterally better when used properly.
Grade 0
Dimenional Robo, Daimagnum
X4 Demonic Eye Monster, Gorgon
X4 Dimensional Robo, Daibattles
X4 Dimensional Robo, Gorescue
X4 Justice Cobalt
X4 Dimensional Robo, Dailander
X4 Dimensional Robo, Daishield
X4 Dimensional Robo, Daitiger
X2 Karenroid, Daisy
Grade 2
X1 Dimensional Robo, Daibarrett
X4 Dimensional Robo, Daidragon
X4 Dimensional Robo, Daifighter
Grade 3
X4 Dark Dimensional Robo, "Яeverse" Daiyusha
X2 Super Dimensional Robo, Daiyusha
X4 Super Dimensional Robo, Daikaiser
.jpg) Reverse Daiyusha doesn't actually have an explicit need to follow through with its Grade 0s. The triggers, while valuable as triggers, don't play a valuable role to the deck any bigger than just that. Daimagnum also takes a back seat here. While his skill is valuable in the late game for better bursting down the opponent should you have the means to immediately replace him, the deck's lack of reliance on SDR Daiyusha means you don't have nearly as much need to dedicate yourself to Daimagnum.
Reverse Daiyusha doesn't actually have an explicit need to follow through with its Grade 0s. The triggers, while valuable as triggers, don't play a valuable role to the deck any bigger than just that. Daimagnum also takes a back seat here. While his skill is valuable in the late game for better bursting down the opponent should you have the means to immediately replace him, the deck's lack of reliance on SDR Daiyusha means you don't have nearly as much need to dedicate yourself to Daimagnum.Similarly, Dailander falls into this ditch. Including that you may more or less be forced into calling it during the midgame just so you don't fall behind offensively, its uses drop from sustaining SDR Daiyusha's advantage generating Critical to maybe bursting with a 3 stage column or making sure your late game beaters take over. Depite this however, while retaining the 'Dimensional Robo' name for Reverse to utilize, its ability to help get your beaters or even excess Grade 1s get strong enough to bully your opponent further during Reverse's Limit Break. Not only will it be boosting beaters, but its 6K base will no longer be a downfall in any way due to (most likely) being locked. With this in mind, it should be relatively obvious why the Grade 2 selection are mostly just beaters.
Obviously though, the key piece of the deck here is Reverse Daiyusha himself. Where standard B.a.s.s. Values function at about 228/49, or 4.7 cards forced out on average, assuming a field not unlike this:




.jpg)

You are looking at a B.a.s.s. Value of about 7.1 cards against, with this specific field, 11K Vanguards. Along with this, with cards like Dailander or Daimagnum, this can build even higher and force out so much more. Granted, fields are extremely situational, so I won't waste time sputtering more B.a.s.s. Values for every individual field setup, but just keep in mind of just how powerful Daiyusha alone is.
...Except, the deck can give you even more. Daikaiser plays a much larger role in the deck than that in the Great Daiyusha deck list and not only makes it possible to potentially lock out or smash straight through Perfect Guard(s), but once more ramps up Reverse Daiyusha's late game so much higher in strength.
How the decks work
What I really want to emphasize here is that these decks are not built to be as optimal as possible. These two builds are here to emphasize their respective bosses specific strengths to the fullest dramatization. What I mean here is that everything was done to make the Great Daiyusha build a powerful midgame deck whereas the Reverse Daiyusha build is designed as a late game oriented one.
 To further my point, Great Daiyusha has virtually zero costs associated with him. Sure, you can argue the Dimensional Robos in Soul requirement may amount to something, but at the same time, it's not like you're losing an arm and a leg without its Limit Break, so the important thing to focus on here is that you are not obligated in any way to reserve, in this case, Counter Blasts for the late game. What this means is that a really good Great Daiyusha build will utterly devote itself to consistently trading its CB for power in the form of the +4K boosts you can give to SDR Daiyusha, since it almost literally has nothing it has to hamstring its efforts to.
This build in particular aims for as much midgame optimization as possible. Thanks to Daimagnum acting as a buffer for Dailander and Daidriller, probability dictates that it's nearly guaranteed to constantly be whacking away at the opponent with a +1 Crit Vanguard if you were to ride into Daiyusha first. In any case where you aren't able to ride into Daiyusha first, Daikaiser's presence in the deck minimizes the worst case scenario of being forced to ride into Great Daiyusha right away, in fact bringing down the probability of having to deal with this to 8.4%, and even lower when you consider the Grade 1 and 2 rides. Even in the off scenario that you fall behind in the late game, be it some unlucky triggers or Daikaiser's lack of pressure makes you lag a bit, Great Daiyusha's late game crit in tandem with the powerful rear guard columns that the +4K units enable will give you a solid means of making a comeback. Everything about the deck is optimized to consistency, and between giving you as powerful of a midgame as possible to forgiving you in as many ways as possible if you miss it, this consistency more than does its job.
What I did to make Reverse Daiyusha's strengths so much more evident is by putting all of the deck's emphasis on the late game. This is why Daimagnum's purpose in the deck has otherwise fallen off, as the need to act as a buffer for Dailander and Daidriller isn't as evident as their place in the Great Daiyusha decklist.
 The important thing to note about the Reverse Daiyusha decklist is just how powerful its late game is. In the best case scenario with Daikaiser and the +4K units, its possible burst down as much as 10 cards if the opponent is at 5 damage. I won't go over the specifics of every single scenario, but it should be more than enough to put into perspective just how powerful Reverse Daiyusha is. The best way to utilize the decklist here is to find the right opportunities to fight your opponent, and do what you could to create those opportunities. What I mean is to think a few turns ahead and know when and where a powerful burst will be virtually guaranteed to win you the game before your own resources run out. Once again, case by case scenario, but the key here is to utilize the cards in your deck to create opportunities. Daikaiser is an extremely easy example; what with his ability to possibly outright bypass Perfect Guards and just demanding so much more out of the opponent in general. Similarly, Dailander can create opportunities for you in the midgame if you know your opponent's deck is prone to midgame pokes by helping to create stage 3 columns. In the late game, Dailander also can double up with Daimagnum to supplement your late game burst. Since you've most likely been saving Daimagnum since most of the time due to not needing to use it in the midgame, during the turn you burst, you can send Daimagnum to the soul to create space for Dailander to be called, offsetting the minus by having given the Vanguard more powerful. On top of having been able to trade off well, since a rear guard circle is open, you can call Dailander there and apply even more power, all this adding on to how devastating Reverse Daiyusha can be.
To end off, Reverse Daiyusha as a card is strictly superior to Great Daiyusha as a card. It has a much stronger late game, its cost isn't too taxing (albeit restraining cards like Daisy and Laurel), and if you want to have a similar performance to the one created in the Great Daiyusha decklist, all you need to do is simply be okay with not using Reverse Daiyusha (much) in the late game. What I should emphasize here though is that you aren't as entirely dedicated to the main gambit then. This should be the defining difference between these two cards, and other card comparisons. While there are some cases where numbers prevail at explaining things, such as the difference between a Cross Ride and a Break Ride's card advantage, not everything can be seen as strictly linear and to be compared directly, as things like being able to devote the entire deck as a whole to a midgame gambit (Great Daiyusha, in this case) to setting up for late game domination (Reverse Daiyusha) take such different routes that trying to compare them directly is simply going to lead to misunderstandings. Instead, let this be a lesson to show how qualitative attributes can make all the difference.

So how would you go about properly using Laurel? When to swing at RGs when he's on the field or always swing at Vanguard? Attack with an unboosted VG or attack with a boosted VG?
ReplyDeleteGenerally, causing pressure is the actual goal of Laurel. So long as you aren't doing anything to jeopardize that, you should be fine.
DeleteOn the other hand however, there are a few situations where you would want to attack Rear Guards. For example, lets say your Vanguard lane hits for 20K but your opponent's Vanguard is 11K. Meanwhile, they also have a 10K intercept on their field and you know the opponent doesn't have any Perfect Guards in hand. This is the perfect opportunity to poke at your opponents hand as it would be even more expensive to defend against.
An example of a situation where you may not want/need to boost is using something like Dailander to get Daiyusha to 14K while the opponent has a 9K unit and you know they have a Perfect Guard. Instead of boosting your Vanguard to 3 stages to attack your opponent's Vanguard, an unboosted attack is already 3 stages on the rear guard. Attacking the rear guard unboosted in this forces the opponent to decide if they want to burn a Perfect Guard on a subpar attack on a rear guard, or having to deal with the raw advantage Laurel allows.
I can go on about specific situations, but the point to take away here is to always act in such a way that favors you in that moment. The key to Laurel is pressure, so whether you're using him to abuse even bigger magic numbers or using smaller magic numbers to make your opponent make hard decisions is the aim of utilizing him, and you should not overly devote yourself to Laurel's restand in and of itself.
Oops, let me rephrase. 10K Vanilla intercept or a unit with 10K base in general for that first example.
DeleteHmm. Ok. I think I see what your saying. Thanks.
ReplyDeleteThx bro :) this helped me a lot :) one thing thro, what If I play 3 daiyusha, 3 ultimate daiyusha and 2 reverse daiyusha ?
ReplyDelete